AWS Keycloak Lab - Part 3

This stage marked a brutal break from the clean, declarative ideal of Terraform; it was the world’s worst game of Whack-A-Mole. I quickly abandoned the terraform destroy command, as continuous infrastructure teardown was too time-consuming. Instead, my debugging method devolved into a brute-force approach: iteratively editing the script and relying on instance reboots, hammering out the configuration in micro-blocks—just two or three lines at a time—to ensure each step was solid before proceeding.
I spent way too long trying to fix the script. I found that starting with a more barebones approach to ensure Keycloak and Postgres would merely run was easier than trying to solve for all dependencies at once. Even then, something might happen—a race condition might occur, or the script would look for a file that didn’t exist yet.
- External Network Failures: After 25 or so tries, I finally ran into an issue where an external service returned a 504 error while pulling a Docker image. This external failure caused my entire dependency chain to collapse, confirming that automation is built on layers of imperfect services.
- The Resource Hangs: I eventually gave up on the
t3.microinstance size and jumped to thet3.small, doubling my cost. Too many times, thet3.microwould hang on my SSH attempts or even simple terminal commands, forcing a hard reboot and console loss. This proved that insufficient compute resources were introducing phantom conditions and stability issues, especially once Postgres and Keycloak were running.
My primary troubleshooting tools involved copious use of docker logs $container_name and relentless review of the system logs via cat /var/log/cloud-init-output.log and the plain cloud-init.log. It was an awesome time, and I would recommend not brute-forcing it like I did. Lesson learned!
Tooling and OS Foundation
I initially defaulted to Amazon Linux 2 and the yum package manager out of habit. However, for a streamlined build, I quickly pivoted to the newer Amazon Linux 2023 utilizing the dnf package manager. This shift streamlined the installation of core components: Docker, AWS CLI, Nginx, Certbot, and the necessary Python Certbot Nginx plugins. I eventually had to modify some of the installed packages.
- I curled the latest
docker-composebinary and created a symbolic link to/usr/bin/docker-compose. - I used
usermod -aG docker ec2-userto allow the default EC2 user to run Docker commands withoutsudo—a minor convenience, though inconsequential for this context. I’m not sure this really mattered since I sometimes wouldsudo suout of anger.
Data & Persistence Setup
This section ensured our PostgreSQL data volume survived a server rebuild, linking the Terraform-provisioned EBS volume to the application.
- Host Path Definition: We defined the host path (e.g.,
/mnt/data/postgres) which will be mapped into the container. - Mounting Logic: I had to implement basic conditional logic for mounting or formatting the EBS volume. This was a major source of confusion! PostgreSQL expects its mount point to be free of data before creating its own data path, and the script must check if the volume has already been formatted on a prior launch.
- Permissions: Crucially, the script ensures the
ec2-userhas the necessary ownership (chown -R ec2-user:ec2-user) over the PostgreSQL host path and data path.
Secure Secrets Retrieval
This step validated the security model established by our IAM role and secrets.tf. Secrets were fetched using the AWS CLI to ensure they were never persisted to the local file system.
- Retrieval and Decryption: The script uses
aws ssm get-parameterwith the--with-decryptionflag, pulling values based on the project name and region. - Immediate Export: The retrieved credentials (e.g.,
$DB_PASSWORD,$KC_ADMIN_PASSWORD) were immediately exported as shell variables within the current session. This avoids the insecure practice of storing credentials in a local file.
Application Orchestration and Keycloak Configuration
With the environment prepped and secrets loaded, the script focuses on networking and service configuration before launching.
- Docker Network: A dedicated Docker network was created for internal container communication.
- Nginx Startup: I included a quick
whileloop to wait for the Docker service to be active usingsystemctl, then enabled and started the Nginx service.
The docker-compose.yml file was then invoked with the specified credentials and necessary settings:
KC_DB_URL/ Credentials- Value/Purpose: Specifies the internal Docker network name and exports the SSM-fetched passwords.
- Troubleshooting Insight: Ensures Keycloak can talk to Postgres via the internal network.
KC_HOSTNAME- Value/Purpose: Must be set to the exact public domain name (
auth.tonymacaronis.net). - Troubleshooting Insight: Essential for creating correct redirect URIs and links within Keycloak.
- Value/Purpose: Must be set to the exact public domain name (
KC_PROXY: edge- Value/Purpose: Configures Keycloak to correctly handle requests coming from a reverse proxy (Nginx).
- Troubleshooting Insight: This was the key operational insight! Without this, Keycloak defaults to assuming it handles TLS and generates invalid HTTP scheme URLs for redirects, leading to security errors and infinite redirect loops. This critical piece of configuration required referencing forums like Stack Exchange due to its omission or lack of prominence in core documentation.
- Port Mapping
- Value/Purpose: Maps port
8080:8080between the container and the underlying host. - Troubleshooting Insight: This architecture uses Nginx as the sole public ingress point, handling all external security (TLS and firewalling). The container port mapping allows Nginx to securely proxy HTTP traffic into the Keycloak container before it is protected and re-routed to port 443 for clients.
- Value/Purpose: Maps port
Certbot Automation and TLS Termination
TLS was a core objective and absolutely essential since I wanted to test IdP flows. I chose Certbot and Nginx for issuing the SSL certificate, as an Application Load Balancer (ALB) seemed like overkill both for cost and complexity here.
- Initial Nginx Config: I first created a minimal
keycloak.conffor Nginx, configured to listen on port 80. This temporary, unencrypted configuration was required solely to enable the ACME HTTP-01 challenge validation, allowing Certbot to prove domain ownership to the Let’s Encrypt CA. - Certbot Execution: Once the initial Nginx configuration was validated, the Certbot process was run. I had previously included more robust error detection and delay logic here to mitigate race condition failures.
- Final Nginx Rewrite (Secure Hardening): After the Certbot process completed, the script used a HEREDOC to completely rewrite the
keycloak.conffile, implementing critical security and operational hardening:- It enabled listening on port 443 (HTTPS) and included the Certbot-mapped certificate and key files.
- It implemented strong SSL options and an
ssl_dhparam. - It permanently redirected all HTTP (port 80) traffic to HTTPS (port 443).
- Key Proxy Headers: When proxying to the Keycloak container (
proxy_pass http://127.0.0.1:8080;), the following headers were explicitly set to ensure Keycloak received the correct client and protocol information:proxy_set_header Host $host;(Preserves the original public domain name for Keycloak redirects.)proxy_set_header X-Real-IP $remote_addr;(Records the true client IP for logging and security.)proxy_set_header X-Forwarded-For $proxy_add_x_forwarded_for;(Maintains a full audit trail of IP addresses.)proxy_set_header X-Forwarded-Proto https;(Crucial for correcting Keycloak’s protocol assumption, preventing redirect loops.)
- I eventually applied a basic IP allowlist filter, allowing only certain IPs to access the sensitive
/adminspace while proxying all other traffic to the Keycloak container.- I would eventually modify this after playing with Keycloak a little more.
The final, critical actions—running nginx -t to test the new configuration syntax and executing systemctl reload nginx to apply the changes—concluded the script. The Keycloak service was now live, accessible, and secured with TLS.
It is worth noting that while the process is now codified, achieving this stability took several, several hours of continuous iteration. This brutal testing also uncovered a non-obvious operational constraint: the Let’s Encrypt Certificate Authority has rate limits for certificates issued per registered domain. After repeatedly provisioning and tearing down the EC2 instance, I hit this limit and was forced to wait nearly 48 hours before trying the Certbot issuance step again. This highlighted a key advantage of defining the infrastructure with Terraform: I could cleanly taint my EC2 instance, rebuild it entirely, or tear down and recreate the application layer on the stable network foundation, all while retaining the same Elastic IP and Route 53 records. The IaC base provided the necessary operational agility to isolate and solve these messy configuration and third-party issues. I suppose the issue was my script, though. Heh.
I had this set-up functioning several times, but I was too unhappy about certain non-automated aspects that I’d keep tinkering and breaking something else. I even tried doing .tpl terraform template files for nginx keycloak.conf and docker-compose and user-data.sh but ran into countless issues resolving varaiables between terraform, the aws user-data script, and the underlying docker compose statements. it was a god awful nigthmarre horrible.
Keycloak Initialization and Testing
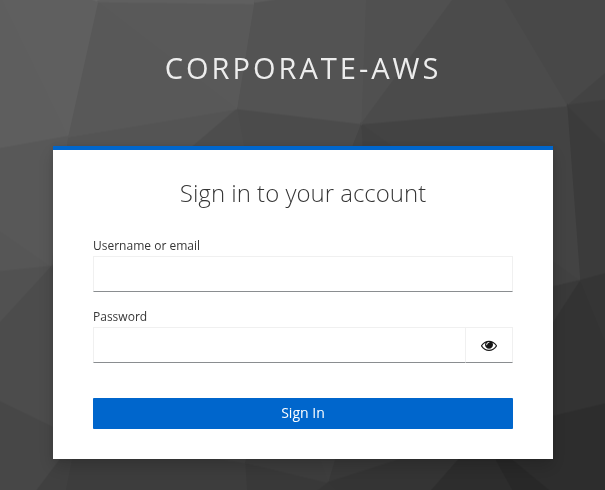
I reviewed a fair amount of Keycloak documentation, which affirmed the best practice of avoiding the default Master realm for anything administative purposes. I created a new, dedicated realm, corporate-aws, and configured Nginx to generally redirect traffic to that instance’s login endpoint. By default, Keycloak directs new sessions to a strange, unsigned-in user-facing instance, which I found counter-intuitive and required specific routing to bypass.
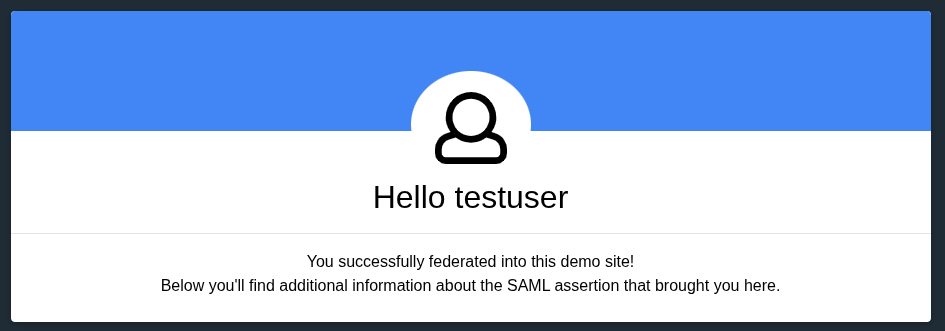
For initial functional testing, I implemented RSA’s IAM Showcase application to validate the core Identity Provider (IdP) flow. After a bit of trial and error with the application registration, I successfully configured my Test User in Keycloak and verified that the SAML 2.0 flow was working. Having only worked with fully managed services like Okta, OneLogin, and Google Workspace before, Keycloak definitely felt significantly more barebones, but offered far greater control over the underlying identity process.
By this point, I was sufficiently exhausted from the troubleshooting that I needed a cognitive break. This is why I started writing these blog posts—to formally take stock of what I had successfully automated and secured so far.
As I contemplated connecting Keycloak to IAM Identity Center, I realized I had technically achieved a portion of my initial goal, even if I didn’t want to hook it up for IAM Identity Center immediately.
What’s next?
I believe the next post must address the limitations of my current monolithic architecture (knowing it was a deliberate proof of concept). The current monolith is functional, secured, and persistent, achieving the goal of a fully automated, self-hosted Identity Provider; however, this architecture must now be critiqued for its single point of failure and lack of resilience — which is why we must now design the enterprise-grade future by refactoring the system to utilize AWS managed services and finally integrate with IAM Identity Center.
I will pivot to thinking about what a more robust, AWS-managed system would look like, including:
- Replacing the EC2 monolith with container orchestration like ECS or Fargate.
- Transitioning Postgres persistence to a fully managed RDS instance or Aurora.
- Moving TLS termination to an Application Load Balancer.
I will possibly introduce fun graphics and diagramming to visualize the contrast between the monolithic and enterprise-grade designs. I have also gotten curious about using Ansible for configuration declaration and management, which represents another interesting path for future exploration and a break from the tyranny of the user-data.sh script. We’ll see what comes next.